Imagine wrapping up your project and it is time to get paid, only to realize you don't have your laptop with you. You're now stuck without a quick, reliable way to bill clients on the go.
In fact, 59% of businesses experience poor cash flow because of manual AR processes and outdated invoice systems. There are multiple reasons for this delayed payment, ranging from cumbersome invoicing processes to the sheer complexity of managing financial transactions on the go.
Fortunately, creating an invoice on an iPhone is easy thanks to Apple's Numbers app. This powerful tool functions like Excel and offers many invoice templates, enabling you to create and send invoices right from your phone, streamlining the payment process.
With the right guide for sending invoices on iPhone, you can go from "I'll do it later" to "Invoice sent" in minutes, no laptop required.
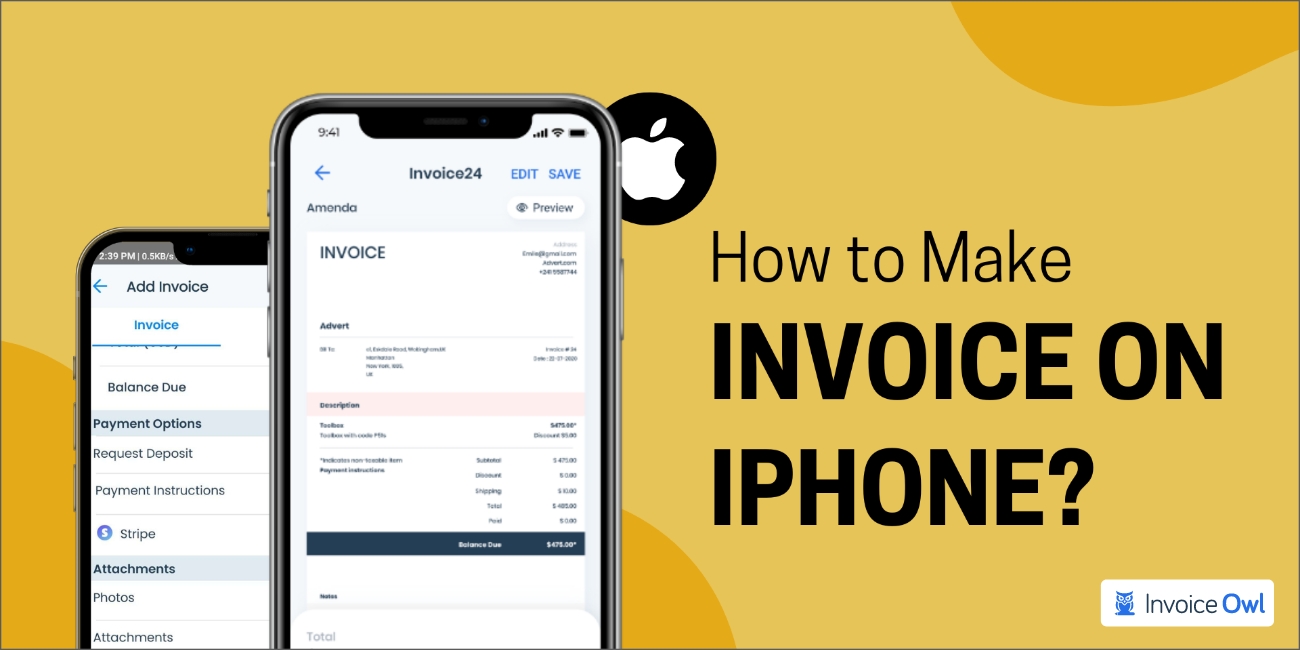
Here is a detailed guide on how to make an invoice on iPhone. We have provided step-by-step instructions for each method to create invoices efficiently from your device.
What You'll Learn
- 01Two simple methods to create invoices on your iPhone
- 02Step-by-step guide for using Apple's Numbers app
- 03How to use professional invoicing apps like InvoiceOwl
- 04Comparison of different iPhone invoicing methods
- 05Professional tips for creating polished invoices on the go
Table of Content
- Quick Start Guide: Essential Methods to Make an Invoice on iPhone
- Challenges Faced While Using the "Numbers" invoicing app on iPhone
- Comparing iPhone Invoicing Methods
- Professional Invoice Creation Tips
- Checklist to Consider While Preparing an Invoice on iPhone
- Conclusion
- Frequently Asked Questions
Quick Start Guide: Essential Methods to Make an Invoice on iPhone
Seems a little challenging for you to make an invoice on an iPhone at first.
But with our step-by-step guides, you can follow this process without spreadsheets, pens, or papers for invoicing your clients. iPhone has some of the best and most cost-effective ways that help users generate custom and professional invoices for free.
2 Simple Ways to Make an Invoice on iPhone:
Method #1: Making invoices with the Numbers app
Method #2: Making invoices using the free online invoice maker app
Consider going through these alternatives one by one and opt for the most suitable method to make an invoice on an iPhone.
Method #1: Generate invoices with the Numbers app
Numbers is Apple's native spreadsheet program that offers you a black canvas so that you have the freedom to tailor the invoices your way. You can further organize the invoicing data as per your own will and move everything around the canvas in a way that matches your brand.
It also provides the cost-effective and ready-to-use invoicing templates available in the app. All you need to do is simply drop your data into the fields and easily customize the font style, size, or cell borders.
Numbers make it possible to resolve complex calculations in an error-free way with the help of advanced automated algorithms. You simply feed in the data and the tool will calculate automatically.
Here is a step-by-step process on how to make an invoice on an iPhone using the Numbers app:
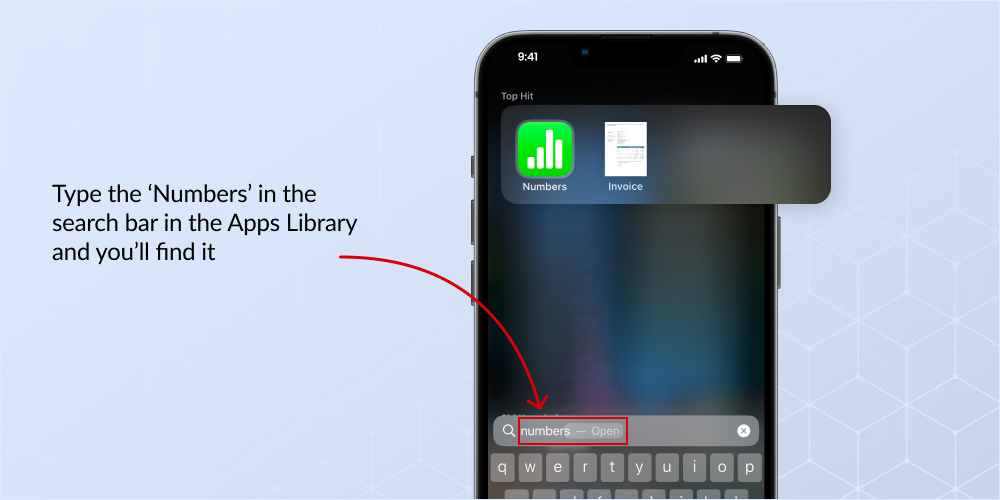
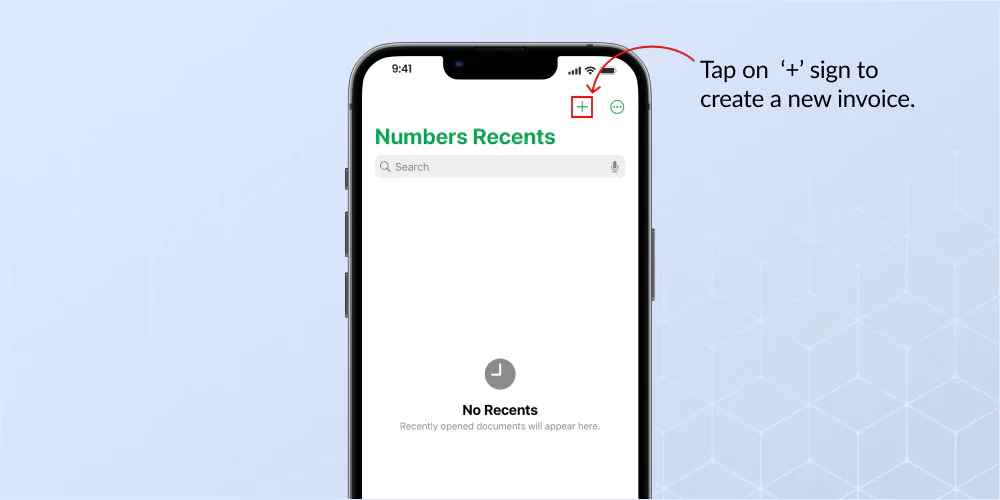
Step 1: Open the Numbers App on the iPhone Open the Numbers App on your phone. Type the 'name' in the search bar in the Apps Library and you'll find it.
Step 2: Go to the '+' sign Once you open the app, you'll be greeted with the 'recent documents' on the home screen. On the top right corner, you'll see a '+' sign. Tap on that to create a new invoice.
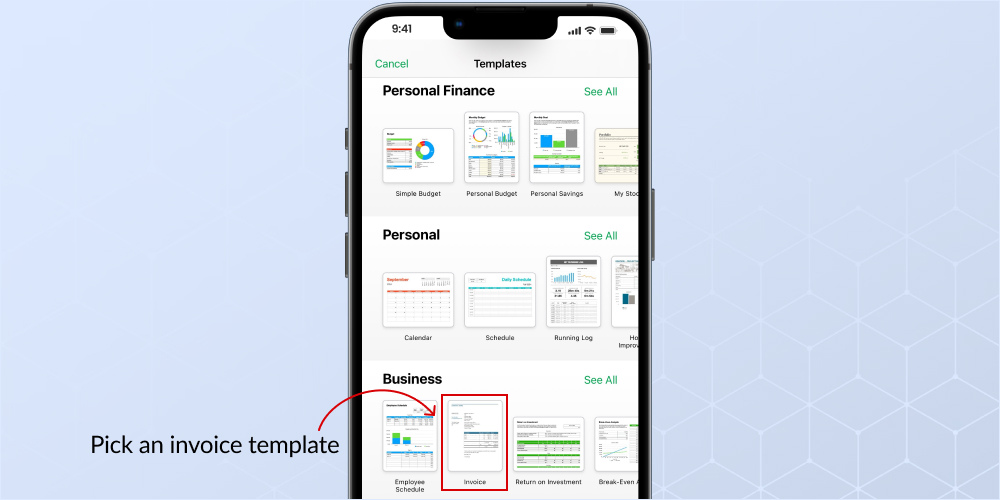
Step 3: Pick an invoice template from the template library You will be redirected to the templates page, where you can either select a blank spreadsheet to work with or get yourself a pre-outlined template. However, since doing things from scratch requires time and skills, invoice template pages are a better option to go with. You can find an invoice template under the 'Business' section of the template library.
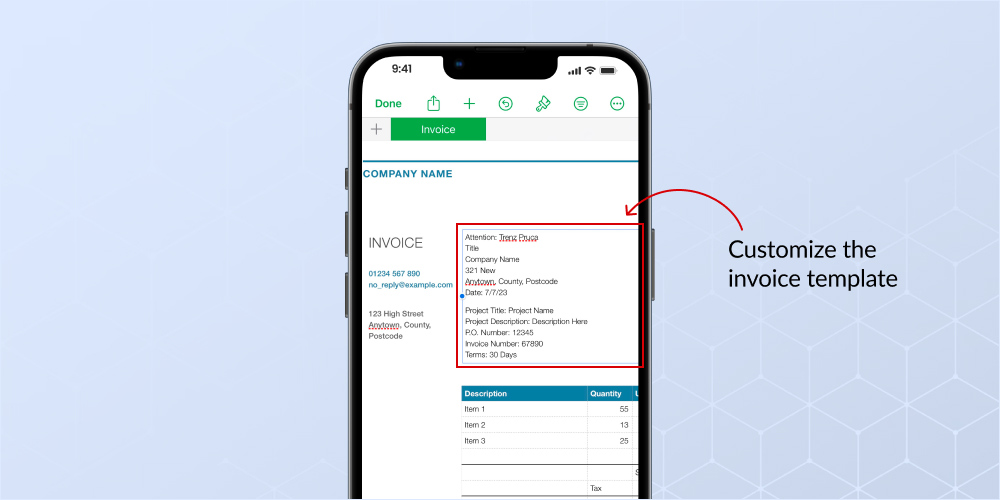
Step 4: Customize the invoice template Pick the invoice template and add the required business information, client details, product or service descriptions, quantities, prices, and total amounts in the designated rows and columns. Be clear about the information you add and cross-check the details in the service description, followed by the cost for each.
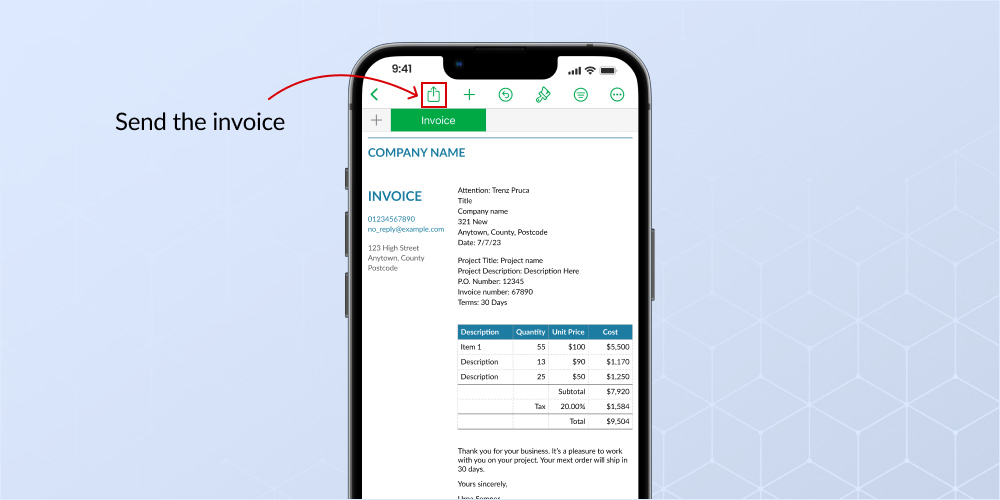
Step 5: Send the invoice Review the invoice once, and then tap on "Done" once you are sure to send an invoice to your client.
Challenges Faced While Using the "Numbers" invoicing app on iPhone
While the Numbers app on your iPhone may seem like a handy tool for invoicing, it comes with its fair share of limitations.
The Numbers app provides only a single invoice template and lacks advanced features like invoice tracking, payment reminders, and client management capabilities that dedicated invoicing tools offer.
- One major drawback is that Numbers offers only a single invoice template. If this template doesn't meet your specific needs, you'll have to either create an invoice from scratch or look for a better alternative.
- The Numbers app provides only basic features, lacking the ability to track invoice status or follow up with clients regarding pending payments.
- Every invoice created in Numbers requires customization and editing before sending, increasing the risk of errors and potentially appearing unprofessional to your clients.
- Sending an invoice through the Numbers app involves multiple steps, leading to unnecessary time consumption and potential delays in receiving payments.
Considering these limitations, it's advisable to explore alternative invoicing solutions. It is not only simplifies the invoice creation process but also streamlines the management, delivery, and tracking of your invoices, ultimately making your invoicing tasks more efficient and hassle-free.
Method #2: Making invoices using the free online invoice maker app
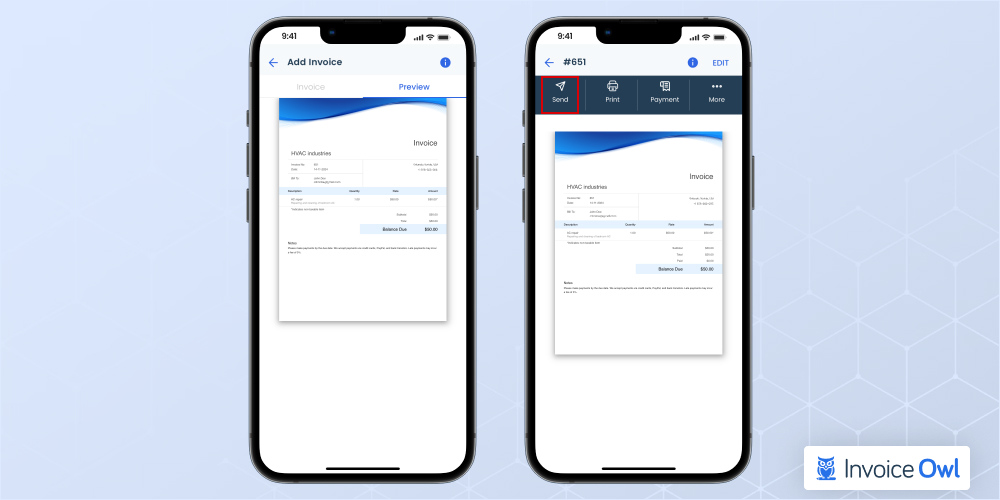
Another method to create invoices is using an iPhone invoice app such as InvoiceOwl. An invoice generator tool makes the process extremely seamless and eliminates erroneous and time-consuming invoice creation. Check out how you can build an invoice using the InvoiceOwl app.
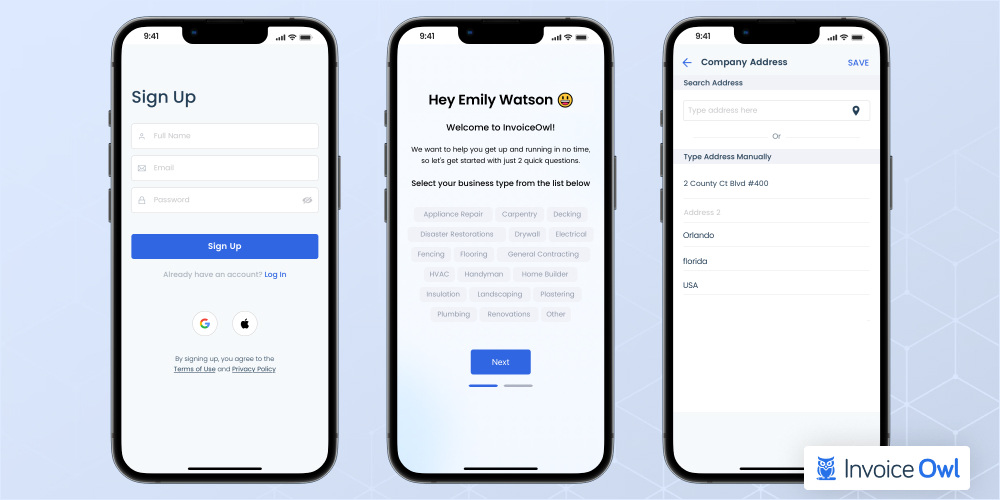
Step 1: Download the InvoiceOwl app for iOS and sign up You can find the InvoiceOwl app on the app store. Download the app and sign up. You can sign up from your Google or Apple account and add your company details, the industry you belong to, and contact details.
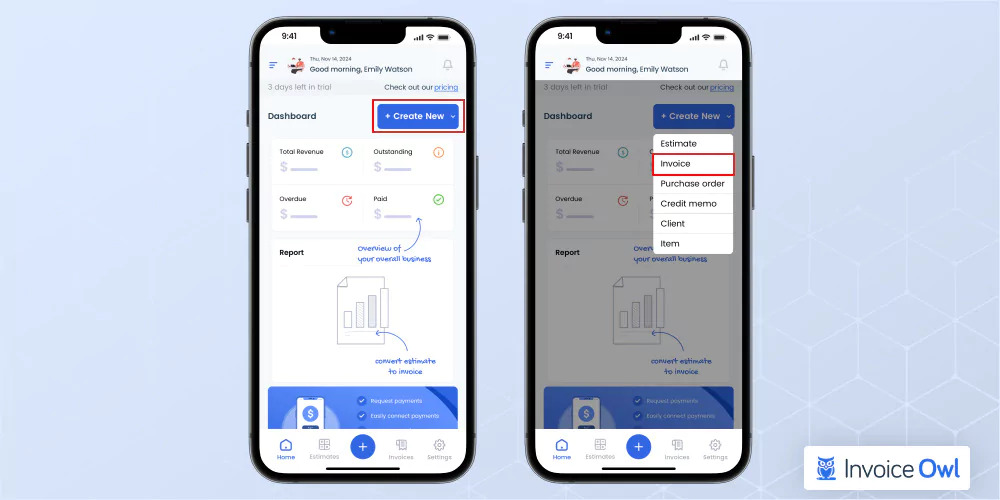
Step 2: Go to 'Create New' Once you're done with the onboarding process, you'll be greeted with the dashboard that gives you a real-time overview of the invoices such as the total revenue, and outstanding and paid payments. To create a new invoice, go to 'Create New' on the top right corner and click on 'Invoice'.
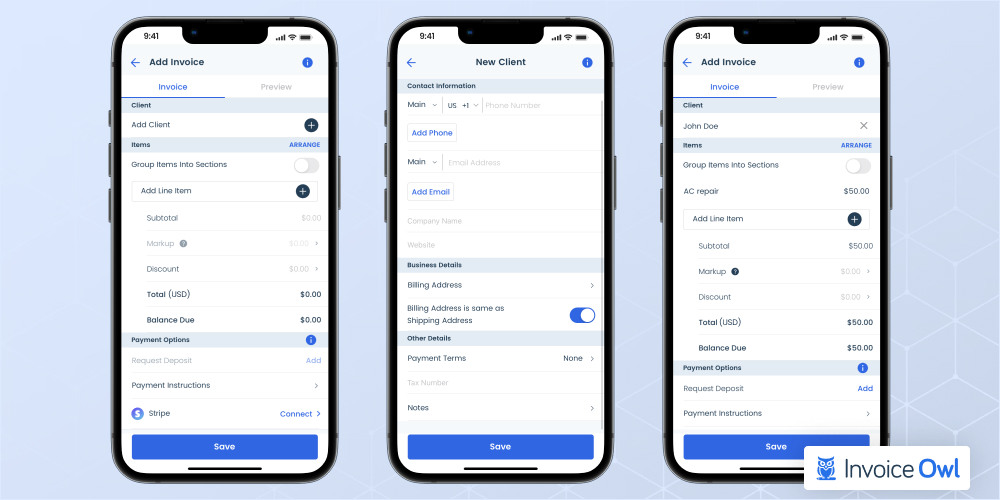
Step 3: Add essential details Start adding the details on your invoice such as your client details. You can choose from existing or create new customers so that you don't have to add their details every time you create invoices for them. Add the line item, discounts, and the total amount along with the balance due.
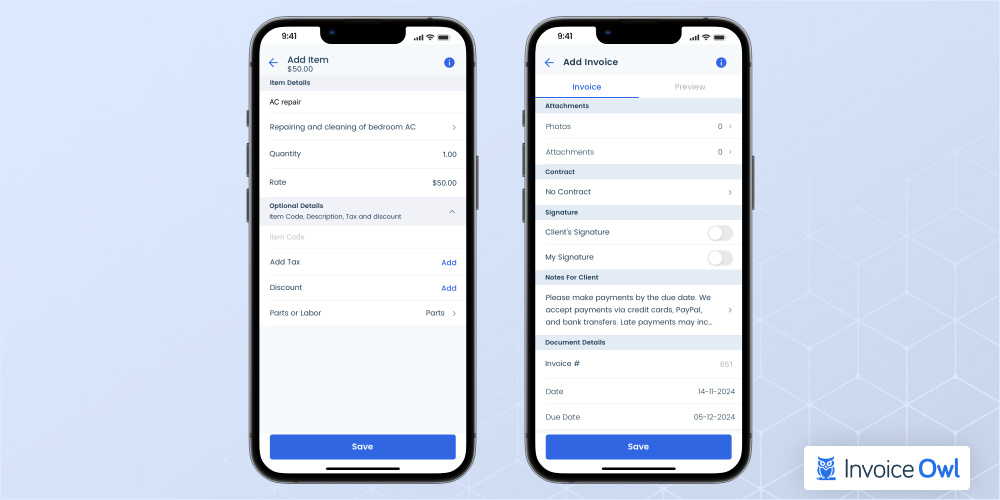
Step 4: Add service and payment details Mention the services in detail so that you can justify the final amount. You can even group line items into sections. Add payment instructions like acceptable payment methods (PayPal, bank transfers, credit cards), late payment rules, and discounts, if any.
Step 5: Preview and send Once you add all the details, click on 'Preview' to cross-check your client details, line items and descriptions, amounts, tax, and discounts. If needed, you can customize your invoice to your branding elements such as adding logo, and brand colors. If everything seems proper, you can click on send, and you're good to go.
Free online invoice app for your iPhone can help you create customized invoices in just a few clicks. Plus you can even customize the invoices, choose from the range of templates available, preview the invoice once before sending it, and then either save the invoice or download it via email.
Use professional invoicing apps like InvoiceOwl to save client information for quick invoicing, automate calculations, and track payment status in real-time.
Comparing iPhone Invoicing Methods
iPhone Invoicing Methods Comparison
| Aspects | iPhone Numbers App | InvoiceOwl |
|---|---|---|
| Customization | Limited customization – can create tables but lacks branding options | High customization – offers customizable, professional templates |
| Automatic calculations | Provides basic automation – needs formulas manually set up | Provides high automation with built in calculations for taxes, totals, etc. |
| Invoice tracking | Not available. Requires manual tracking | Provides tracking for tracks sent, viewed, and paid invoices |
| Client management | Limited – no dedicated client management | Yes – stores multiple client details for quick invoicing |
| Payment reminders | None – must manually follow up | Yes – sends automated reminders for unpaid invoices |
Professional Invoice Creation Tips
Here are some ways to create invoices that look professional and showcase your brand effectively:
Use consistent formatting: Pick a professionally designed template with an organized layout. Ensure consistency in font sizes and styles throughout the document to create professional invoices.
Include key information: Add all the important details like client information, payment terms, and itemized services.
Incorporate your branding: Add a brand logo and colors to showcase your business identity. This builds trust and improves brand recall.
Use automation tools and invoicing app: Automate your calculations and recurring invoices with an invoice app to improve accuracy.
Review before sending: Ensure to check twice all the details for enhanced accuracy and professionalism before sending the invoice to clients.
Time to Supercharge Your Invoicing Efficiency!
Join 100,000+ contractors using InvoiceOwl to create professional invoices on the go. Experience streamlined billing, reduced errors, and real-time data access.
Start Your FREE TrialChecklist to Consider While Preparing an Invoice on iPhone
While creating invoices on an iPhone, you can keep this checklist handy.
1. Branding
Considering that your invoice is a document that represents your business, you must ensure that it reflects the branding that you wish to convey. Think of logos, colors, fonts, and wording that appear in the item's description and the text of your payment terms.
2. Template customization
Include some information on your invoices to be valid. The word 'invoice' must be displayed on the document. It is also essential to include the following information:
- A unique number for invoice identification
- The name and address of your business, as well as your contact information
- Customer's business name and address
- There must be a clear explanation of what you charge for in your charge sheet
- It is also referred to as the supply date if you provided the goods or services before the date on which they were requested
- Invoice date
- Charge(s) you are making
- The amount of tax
- The amount owed in total
3. Price
The price needs to be right when asking for online payments. You could end up being in the embarrassing situation of either having to ask for more money or refunding your clients if their order is overvalued.
Include your most recent quote at the end of your invoice, and remember that if you have promised any discounts or special offers to your customers, you include the most recent pricing in your invoice.
4. Description
Ensure that the invoice's description is as straightforward as possible when describing what you sell. This will help you avoid client queries.
5. Payment information
Ensure that your customers can pay you quickly. On your invoices, it is essential to include the details of your bank account or if you will accept payments online.
Conclusion
Knowing how to make an invoice on an iPhone gives you the flexibility to manage your billing process wherever you are. If you are with the Numbers app or want a more advanced solution like InvoiceOwl, you have options to suit your needs.
InvoiceOwl prioritizes your data security and compliance with industry standards. Additionally, it adheres to GDPR and other relevant regulations, ensuring that your invoicing process is not only efficient but also secure and trustworthy.
If you want to receive fast payments, you can do that using InvoiceOwl—an easy-to-use invoice app for iPhone. You can create unlimited invoices, manage multiple accounts, and even sign documents digitally. Start your free trial to learn more about the tool.
Frequently Asked Questions
Almost all the free invoice generation tools, such as Google Sheets or Microsoft Excel, include sharing the invoices with others so they can receive the invoice immediately.
The best way to create an invoice on an iPhone is to use professional invoicing software. This software provides you with professional-looking templates, automated calculations, and important detail fields. Following consistency and font style will ensure the polished look of your invoices.
While making an invoice on an iPhone, you need to avoid missing important information like client details, itemized costs, and payment due dates.
Generally, most invoicing applications allow you to integrate your brand into the invoices. Start by adding a business logo, and choose specific brand colors to generate professional invoices.
An iPhone invoicing application is an efficient invoicing solution that provides you with customizable templates to add or remove any specific fields and make changes in the layouts. These features help you meet your client's needs effortlessly.
To handle taxes when creating invoices, many invoicing apps, like InvoiceOwl, that help you to set tax rates and calculate taxes automatically. This ensures compliance with tax regulations and simplifies the process.
The best invoicing apps available for iPhone users are InvoiceOwl, QuickBooks Accounting, FreshBooks, Zoho Invoice, and Xero Accounting. These apps offer features like customizable templates, client management, and payment tracking.